Pages

Sunday, October 26, 2014

Night Lords Night Raptor (part 1)

Night Lords is one of the space marines chapter that I really want to paint for a long time. Because they have outstanding and unique color scheme with the lightning crackling on their armor. I think it will be quite a challenge for painting and try to make the lightning look realistic on that tiny area. I'm not sure how it will turn out, we'll see it soon.
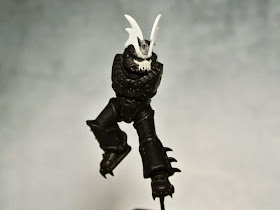
The mini was converted from Chaos Space Marine Raptors/Warp Talons kit. I stretched the height of the hip with Magic Sculpt, same as I did on Raven Guard Assault Marine. I also added more details on the helmet. At first, I added blade made form plastic but it looks like Zaku head with antenna. So I changed it with bat wings and sculpted skull mask from Magic Sculpt, inspired from Forge World Night Raptors that I found out later.

Night Lords เป็นหนึ่งในหน่วยของ Space Marines ที่ผมอยากลองทำสีมานานแล้วครับ เพราะว่าหน่วยนี้จะมีสีที่เป็นเอกลักษณ์มากๆ คือลายฟ้าผ่าที่พาดอยู่บนเกราะรอบๆตัว ซึ่งดูแล้วคิดว่าคงจะท้าทายดีในการลองทำสีลายฟ้าผ่าลงบนพื้นที่เล็กๆและพยายามทำให้มันดูสมจริง ไม่แน่ใจเหมือนกันว่าจะออกมาเป็นแบบไหนต้องรอดูกันต่อไปครับ
ส่วนตัวมารีนตัวนี้ ดัดแปลงมาจากชุด Chaos Space Marine Raptors/Warp Talons ครับ ผมทำการยืดส่วนเอวให้ดูยาวขึ้นโดยการปั้นเพิ่มด้วย Magic Sculpt แบบเดียวกับที่ผมได้ทำในงานชิ้นที่แล้ว Raven Guard Assault Marine เพื่อให้สัดส่วนของลำตัวนั้นดูสมส่วนมากขึ้นครับ นอกจากนี้ก็ทำการเพิ่มรายละเอียดบนหมวก ซึ่งตอนแรกผมตัดพลาสติกมาแปะ ให้มันดูมีเรื่องราวมากขึ้น แต่ดูๆไปแล้วมันดูเหมือนกับหัวของ Zaku แบบติดเสาอากาศมากกว่า พอดีไปเจอภาพของ Forge World Night Raptors ซึ่งเป็นหน่วยเดียวกับที่จะทำพอดีเลยนำมาใช้เป็นแบบ และปั้นส่วนของหน้ากากหัวกระโหลกขึ้นมาใหม่ด้วย Magic Sculpt กับส่วนของปีกค้างคาวที่ทำจากแผ่นพลาสติกครับ


(photos courtesy of  http://warhammer40k.wikia.com/)

Saturday, October 18, 2014

Raven Guard Assault Marine

(Space Marines On Display no.04)

Here are the pictures of my recently finished project. I have planned to write a Step by Step article of making and painting this base. All of the photos have already taken and it's time to write the article, the hardest part in my opinion. :) I hope to publish this article in the next issue of Figure Painter Magazine and will be announced again when it finished.
I still have some projects that waiting on my desk for a while, Soviet Mountaineer bust & Night Lords Night Raptor. I will post the update from each project soon.
Have a nice Sunday :)

ภาพของผลงานที่เสร็จแล้วครับ ผมวางแผนเอาไว้ว่าจะเขียนบทความเกี่ยวกับวิธีการสร้างและทำสีฐานของงานชิ้นนี้ ซึ่งได้ถ่ายรูปขั้นตอนต่างๆเอาไว้แล้ว เหลือในส่วนของการเขียนบทความครับ และคงจะลงตีพิมพ์ในนิตยสาร Figure Painter Magazine ฉบับถัดไป แล้วจะแจ้งให้ทราบอีกครั้งเมื่อทำเสร็จครับ 
สำหรับตอนนี้ยังเหลืองานที่ทำค้างเอาไว้อยู่อีกสองชิ้น คือ Soviet Mountaineer bust และ Night Lords Night Raptor ซึ่งจะนำความคืบหน้าของแต่ละโครงการมาลงอีกครั้งเร็วๆนี้ครับ 


Tuesday, October 14, 2014

Raven Guard Assault Marine (part 3)

The arms and jetpack was separated from the body for an ease of painting. I chose to paint the arms with white color as I saw on the kit box art. It was done with 4-5 layers of shading from Off White to Light Grey and lining with German Grey. The Raven Guard symbol and the name "Arepo" was hand painted and I added wear and tear on the arms after everything has finished (except the axe blade and handle).
I also painted the OSL (object source lighting) on the rear jetpack vent and inside of the jet pipes. I found a useful tutorials for this method by HopeRiver and Chest of Colors. You can find it on the links below.
The next update will be the finished piece, stay tuned :)

Dark Angel Chaplain with Jump Pack by HopeRiver
How to paint OSL effect on a jump pack by Chest of Colors

ส่วนของแขนและเจ็ทแพ็ค ผมแยกออกมาต่างหากเพื่อความสะดวกในการทำสี เนื่องจากมารีนตัวนี้ผมเลือกที่จะทำสีของแขนให้ต่างจากสีของลำตัวด้วยสีขาว ตามแบบที่ได้เห็นจากภาพตัวอย่างด้านหลังของกล่องชุดคิทนี้ครับ ผมใช้การทาเกลี่ยไล่สีประมาณ 4-5 เฉดสี ไล่จากสี Off White ในพื้นที่สว่างไปยัง Light Grey ในส่วนของเงา เพื่อให้สีขาวนั้นเกิดมิติของแสงและเงาและไม่ดูแบนครับ จากนั้นทาเก็บตามร่องและรอยต่อต่างๆอีกครั้งหนึ่งด้วยสีเทาครับ ส่วนของสัญลักษณ์รูปอีกาและตัวอักษร Arepo นั้นเขียนด้วยมือครับ และเมื่อทำสีในทุกๆส่วนเสร็จแล้ว จึงค่อยมาทำร่องรอยขูดขีดและความเสียหายต่างๆบนแขนครับ เพื่อสื่อให้เห็นถึงการผ่านสภาพการใช้งานมาอย่างพอสมควร
นอกจากนี้ในส่วนของ เจ็ทแพ็ค ผมได้ทำสีด้วยเทคนิค OSL (object source lighting) ในบริเวณของช่องระบายอากาศและด้านในไอพ่น ซึ่งเทคนิคนี้เป็นการทำสีแบบจำลองจุดกำเนิดแสงภายในชิ้นงานและแสงจะกระจายออกมารอบๆจากจุดกำเนิดนี้ ทำให้ดูแล้วเหมือนกับว่ากำลังมีไฟส่องสว่างอยู่จริงๆครับ ตัวอย่างของงานที่โดดเด่นมากๆในการใช้เทคนิคนี้

Lost in the Dark by David Powell
Firey Angel by victoria 
Done and Dusted by Orki 

หรือจะลองเข้าไปดูวิธีการทำสีของเจ็ทแพ็คแบบนี้ได้ตามลิ๊งค์ด้านล่างครับ เป็นวิธีที่ HopeRiver และ Chest of Colors ได้ทำเอาไว้ครับ

Dark Angel Chaplain with Jump Pack by HopeRiver
How to paint OSL effect on a jump pack by Chest of Colors


Thursday, October 9, 2014

Raven Guard Assault Marine (part 2)

The painting was finished with Vallejo and Citadel as usual. I did paint the shading on the black armor and glazed over with Intense Blue in order to make the dark blue-black armor. But it barely see on the picture because it was reflected with the light. I hope it will be seen clearly after coated with Mr.Color Super Clear (Flat) when the whole project has finished. 
You can find the tutorials that I used for painting Black and NMM on the links below :)

Black color painting tutorial by Flameon
NMM Steel & Gold tutorial by HopeRiver

การทำสีของมารีนตัวนี้ผมใช้สีของ Vallejo กับ Citadel ครับ ผมทำการเพนท์ไล่แสงเงาในส่วนของเกราะสีดำและทาเคลือบทับในส่วนที่ไล่แสงเงาไว้ด้วยสีน้ำเงิน Intense Blue เพื่อที่จะให้สีของเกราะนั้นดูเหลือบๆเป็นสีดำและน้ำเงินเข้มครับ แต่ว่าถ่ายรูปออกมาแล้วจะมองไม่ค่อยเห็นเนื่องจากเกิดแสงสะท้อนบนเกราะสีดำในระหว่างถ่ายภาพ ซึ่งหวังว่าหลังจากที่พ่นเคลียร์ด้านทับเมื่อจบงานแล้ว น่าจะช่วยทำให้เห็นการไล่สีในส่วนต่างๆได้ง่ายขึ้นครับ
ส่วนด้านล่างนี้เป็นลิ๊งค์ไปยังบทความสอนวิธีการทาสีดำและทาสีเหล็กและทองแบบ NMM ที่ผมนำมาใช้ในการทำสีตัวนี้ครับ

Black color painting tutorial by Flameon
NMM Steel & Gold tutorial by HopeRiver


Monday, October 6, 2014

Raven Guard Assault Marine (part 1)

Switch back to the miniature project. :)
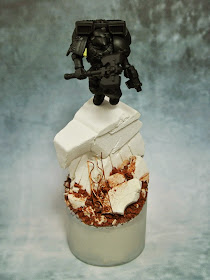
I finished building this mini with its base for a while. The marine was made from the parts of Space Marine Vanguard Veteran Squad kit. I did a bit conversion on this mini by stretching the height of the hip with Magic Sculpt and added more details on it. In order to make the torso look longer and more proper with the scale, in my opinion.
The base was made from carved plaster in eagle statue shape and brick debris, glued on the round plinth with white glue (diluted with water). Wrought iron was made from copper wire, cut and bent in shape and glued together with super glue (Cyanoacrylate). 
It doesn't have a socket on the base this time because it will be better to show the action of this mini on the high ground, take off from the statue.

งานชิ้นนี้ผมทำเสร็จในส่วนของการประกอบและทำฐานเตรียมไว้ซักพักแล้วครับ ส่วนของตัวมารีนนั้นประกอบมาจากชุด Space Marine Vanguard Veteran Squad และทำการดัดแปลงเล็กน้อยตรงส่วนของสะโพก โดยยืดให้สะโพกนั้นดูสูงขึ้นด้วย Magic Sculpt เพื่อที่เวลาติดส่วนของลำตัวลงไปแล้วจะทำให้ช่วงตัวนั้นดูยาวขึ้นและสมส่วนมากขึ้นครับ 
ส่วนของฐานนั้นใช้การแกะปูนพลาสเตอร์เป็นรูปปั้นหัวนกอินทรีย์ครับ และตกแต่งซากปรักหักพังด้วยเศษอิฐเศษปูน ติดลงบนฐานทรงกระบอกด้วยกาวลาเท็กซ์ผสมน้ำครับ (วิธีการทำฐานทรงกระบอก) ส่วนเหล็กดัดทำจากลวดทองแดง นำมาดัดให้ได้ตามทรงที่ต้องการแล้วติดกันด้วยกาวช้างครับ
ในงานชิ้นนี้ผมไม่ได้ทำฐานแบบที่ให้มีช่องไว้สำหรับใส่ฐานขนาดเล็กแบบชิ้นก่อนๆ เนื่องจากลักษณะและท่าทางของมารีนตัวนี้สามารถที่จะสื่อถึงการทะยานหรือกำลังจะบินขึ้นบนฟ้าได้ จึงเหมาะกับฐานที่มีพื้นที่สูงๆแบบนี้มากกว่าครับ