Wednesday, September 18, 2013

Some of my Shelf Queens (AFV models - Part 3)

Translated by Krittadhi Boonvichitr (ZAlpha)

4. Tiger I (Early Production) - (Tamiya 1/48 scale w/Voyager Photo Etched set)
This model have been built and modified using Photo-Etched from Voyager plus additional bits and pieces made from plastic and copper wires in 2009 – 2010. I intended to made a 1/48 scale diorama with this one. However, since the 1/48 figure is quite hard to find (and the available poses were not of my likings), I decided to hold this project until everything necessary is available.

ทำการเพิ่มเติมรายละเอียดจนเสร็จราวๆปี 2009-2010 โดยใช้ชุดแต่งของ Voyager รวมกับชิ้นส่วนที่สร้างขึ้นเองจาก พลาสติกแท่งและแผ่น ลวดทองแดง และแผ่นตะกั่ว งานชิ้นนี้ตั้งใจจะทำฉากจำลองในขนาด 1/48 แต่เนื่องจากฟิกเกอร์ในมาตราส่วนนี้นั้นหาค่อนข้างยาก (และท่าทางไม่ตรงกับรูปแบบที่คิดไว้) เลยพักงานนี้เอาไว้และรอจนกว่าอุปกรณ์ประกอบฉากทุกอย่างจะพร้อม


-------------------------------------------------------------

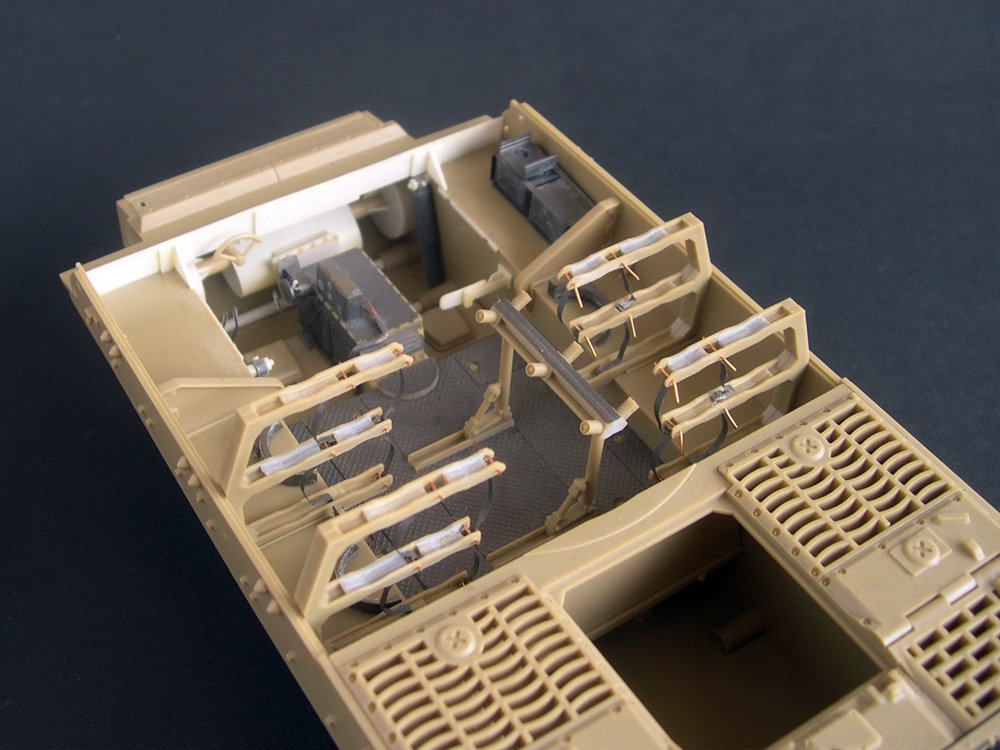
5. Sturmtiger - (Tamiya 1/35 scale w/Eduard Photo Etched set)
After seeing the picture of this particular tank from a competition in Europe, I decided to give it a try. I added some of the interior details to the model, as they will be visible when opening the top for loading the ammo. I made the gear box out of plastic sheet. (Since it’s only slightly visible, I just made the rough shape of the gear box and not every detail on it). Additional details were added using Eduard photo-Etch set. This work was done in 2009-2010

หลังจากที่ได้เห็นภาพของรถถังคันนี้จากงานประกวดในยุโรป เลยอยากที่จะลองทำดูบ้าง และทำออกมาแบบให้เห็นรายละเอียดภายในบางส่วน เพราะเวลาเปิดฝาสำหรับโหลดกระสุนที่ด้านบนตัวรถ จะมองทะลุเข้าไปได้  จึงต้องสร้างส่วนของ gear box ด้วยแผ่นพลาสติก (แต่เพราะจะมองเห็นได้แค่รางๆ เลยทำแค่รูปทรงโดยรวมเท่านั้น ไม่ได้เน้นรายละเอียดตามของจริง) และใช้ชุดแต่งดีเทลเซ็ตของ Eduard งานชิ้นนี้ทำค้างเอาไว้แค่นี้ ตั้งแต่ปี 2009-2010


---------------------------------------------------------------------------------------------

For some of the pieces seen on previous posts, I intend not to paint it and just keep it as is so I could look back and study the way I create additional details on my past works. Also, it would be easier (and less time consuming) to just buy a newer version of these kits in some cases which have better and more accurate details. I hope that someday I will be back with the inspiration to finish these “undone” projects once more.

Happy modeling to all of you! :)

งานบางชิ้นที่เห็น ผมตั้งใจเอาไว้ว่าจะไม่ทำสีหรือทำต่อให้เสร็จ และจะเก็บเอาไว้แบบนี้ เพื่อที่จะได้เห็นถึงวิธีการในการเพิ่มเติมรายละเอียดของตัวเองในงานชิ้นเก่าๆ (บางชิ้นถ้าจะทำต่อให้เสร็จ ซื้อของที่ออกมาใหม่มาทำ จะได้รายละเอียดที่ดีและถูกต้องกว่า ประหยัดเวลาและแรงงานในการดัดแปลง) และหวังว่าในอนาคตผมคงจะมีแรงบันดาลใจให้กลับมาทำงานที่ค้างเอาไว้ให้เสร็จได้อีกครั้ง แฮปปี้โมเดลลิ่งครับ ทุกๆท่าน

Tuesday, September 17, 2013

Some of my Shelf Queens (AFV models - Part 2)

Translated by Krittadhi Boonvichitr (ZAlpha) 

3. Panzer IV Ausf.H (Mid Production) - (Tamiya 1/35 scale)
Modified from an early model made by TAMIYA, this Panzer IV have been turned into Mid Production model using a combination of plastic sheets, lead bits, and copper wires to add realistic details to the model. It is another one of my collection which was originally intended to be used for diorama but got shelved since 2005 or so.

ดัดแปลงจากของทามิย่าที่เป็นรุ่น Early ให้กลายเป็น Mid โดยใช้แผ่นพลาสติก แผ่นตะกั่ว และลวดทองแดง ในการเพิ่มเติมรายละเอียด เป็นอีก 1 งานที่ตั้งใจว่าจะนำไปใส่ในฉากจำลอง และเก็บเอาไว้ตั้งแต่ปี 2005-2006


Monday, September 16, 2013

Some of my Shelf Queens (AFV models - Part 1)

Translated by Krittadhi Boonvichitr (ZAlpha) 

These are some of my un-finished works done in the past few years. While many of them have been modified and ready for painting, due to another more interesting projects  getting in the way (especially right now when I’m really in to miniatures painting) they are never finished. This is one of my bad habit I planned to fix so that I could finish one project at a time without having more and more project hanging in the air (and sitting in the shelves). Let me show you some of my “undone” projects today.

นี่เป็นผลงานเก่าๆ ที่ผมได้ทำเอาไว้ในช่วงหลายปีที่ผ่านมาและยังไม่เสร็จเรียบร้อย หลายๆชิ้นนั้น ผมทำการดัดแปลงตกแต่งเพิ่มเติมเอาไว้เสร็จแล้วเหลือเพียงแค่นำมาทำสี แต่ด้วยความที่บางครั้งจะมีความสนใจอื่นๆที่สอดแทรกเข้ามาในช่วงเวลานั้นๆ ทำให้ความสนใจในงานที่กำลังทำอยู่นั้นหมดลง และอยากที่จะเอางานอื่นๆขึ้นมาทำแทน (โดยเฉพาะในตอนนี้ที่กำลังหลงใหลในการเพนท์มินิเอเจอร์) นี่เป็นนิสัยเสียที่ผมพยายามจะแก้ไขอยู่ เพื่อให้สามารถทำงานให้เสร็จเป็นชิ้นๆไป โดยที่ไม่ต้องค้างงานเก่าๆเอาไว้ แต่ยังไม่สำเร็จเสียที เลยทำให้มีงานเก่าๆที่ค้างอยู่ในตู้หลายชิ้น วันนี้เลยเอาภาพของงานที่ทำค้างๆเอาไว้มาให้ชมกันครับ

1. Nebelwerfer  - (Italeri 1/35 scale)
I started this piece almost ten years ago. At that time I was practicing adding realistic details to the models by using photo references. Back then, the materials used were plastic sheets, lead sheets, and copper wires. After finished adding those details the model was left collecting dust since I couldn’t find a suitable figure to go along for the diorama.

งานชิ้นนี้ทำเอาไว้เกือบ 10 ปีแล้ว ในช่วงที่หัดการเพิ่มเติมรายละเอียดให้กับโมเดลตามรูปภาพอ้างอิง เพื่อให้ตัวโมเดลนั้นมีรายละเอียดใกล้เคียงกับของจริงให้มากที่สุด วัสดุที่ใช้ในตอนนั้นคือแผ่นพลาสติก แผ่นตะกั่ว และลวดทองแดง หลังจากทำเสร็จแล้วก็เก็บเอาไว้ในตู้เพราะผมยังหาฟิกเกอร์สำหรับมาประกอบในฉากจำลองร่วมกันไม่ได้


-----------------------------------------------------------


2. DKW NZ 350 - (Tamiya 1/35 scale w/Voyager Photo Etched set)
This piece was intended to be used for vignette but eventually put on hold as there are no suitable figures to go with it. This model is modified using photo-etch set from Voyager plus some additional scratch built parts using plastic bits and copper wires.

งานชิ้นนี้ตั้งใจไว้สำหรับทำฟิกเกอร์วิคเน็ท แต่สุดท้ายก็เก็บเอาไว้เพราะยังหาฟิกเกอร์ที่ถูกใจไม่ได้เช่นเดียวกัน ผมใช้ชุดแต่งดีเทลเซ็ตของ Voyager ในบางส่วน และบางส่วนก็ต้องสร้างขึ้นมาเองด้วยเศษพลาสติกและลวดทองแดง


Wednesday, August 28, 2013

Skaven Warlord

Here is another project I've finished in this month :) This time I focused on working with true metallic metal. It's different than NMM technique as I usually use especially the reflection of the metalic colors, and It makes this technique a little bit difficult during the painting process. Also, I followed these tutorials as shown below and try to make it the best that I can :)
  
   - True Metallic Metal - Step by Step video tutorial 
      by Iguazzu from Cursed Monkey (very helpful and ease of understanding)
   - Metallics article by Automaton
   - Tutorial - Painting True Metallic Metal (TMM) 
      by Jarhead from MASSIVE VOODOO
      (both articles are quite interesting and very helpful as well)

For painting TMM, I used metallic colors from Vallejo Model Air & Model Color (Silver & Gun (VMA), Silver & Gunmetal Grey (VMC) and Citadel (Runefang Steel & Sycora Bronze) and used Dark Rust, Light Rust (Vallejo Panzer Aces) for the rusted area inside the shadow.

After it finished, the result wasn't good enough as I expected, especially the grains of the metallic looks a little bit too big and off the scale (when comparision to the others in those tutorials). Maybe it because I coated the whole mini with flat clear and it made the grains clearly visible. I'm still working on this technique and need more practice. :)


This mini is up for sale on ebay along with Eldar Farseer. If you are interested, please click the names below for the links to the auction :


Happy bidding all :) 

Also, I've decided to accept commission works for painting miniatures wargames or historical figures. If you are interested in my works and have any questions, Please feel free to contact me via: tgdbk1-at-gmail-dot-com

Eldar Farseer

This is the first mini that I've finished since I live here. It took several months to finish because at the early months when I arrived, I have many things to do about living and studying. And when I have more free time for painting, I realized that I've forgot some of my frequently used tools in Thailand. Many things that necessary for modelling such as sandpaper, putty, glue, palette, oil paints, pigments and a lot of materials for making the base. *o* Now I'm start to collecting all of this stuff again.

At this time, I still don't have airbrush and compressor. It's the important tool for my works (especially if I want to build AFV models or Diorama). Because even all of my minis were painted with a brush, but for the priming and coating (Flat clear) I always used an airbrush, which better than using a black primer spray or super clear flat spray in my opinion. And of course, airbrush can do many things better and faster than a brush, this is the important tool that I must buy asap.

However, This mini was finished by using acrylic (VMC) for both painting and weathering. I've changed the color scheme and added freehand for make it different than GW version. Also, these pictures were taken with my brother's camera. It's not a good camera for taking close up pictures like this, which It's needed for taking miniatures pictures to show their little details. Sorry for some blurred details and out of focus, this is the best I can do at this moment  :( 


Lastly, I'm not sure about the correctness of grammar while writing this article. Hope it's better than before and I'll keep practicing for the better. :)