Sunday, June 29, 2014

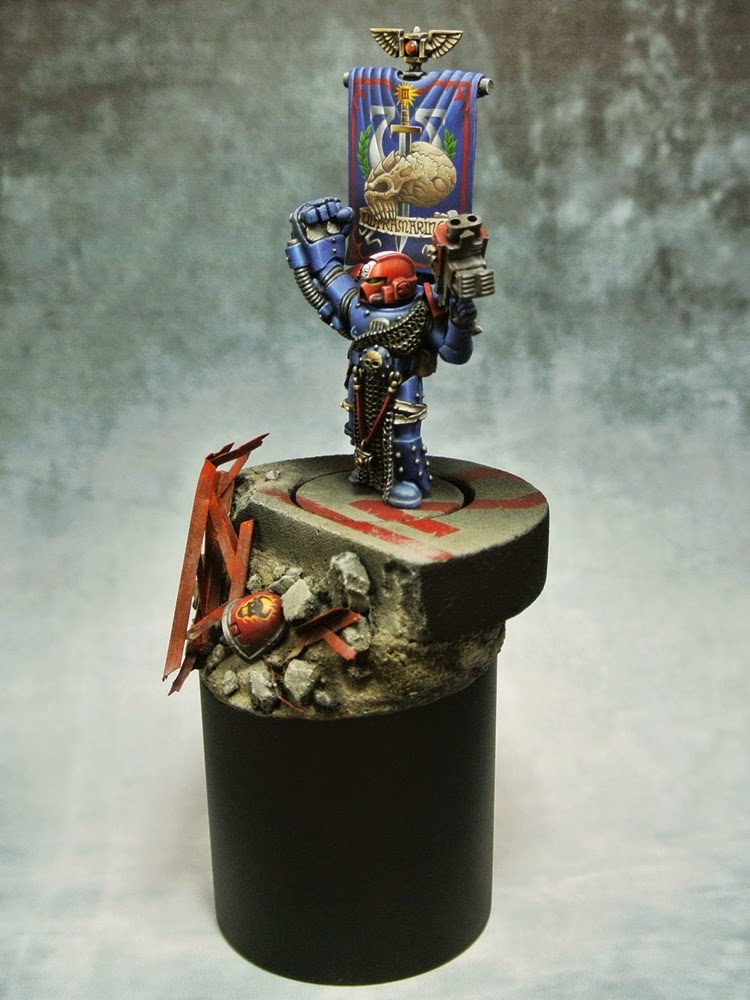
Ultramarines Veteran Sergeant

3rd Company, Scourge of the Xenos
(Space Marines On Display no.03)

My third mini for SMOD project, it was converted from 2005 Games Day Miniature - Veteran Sergeant Aurelius. I replaced the original bare head with a helmet from Space Marines Vanguard Veteran Squad and made a new banner on the backpack from Magic sculpt and plastic rod. I used the same techniques as usual for painting this mini such as NMM, Blending, Glazing and added freehand painting on the banner, which was the main challenge of this mini and it makes the mini more stand out. I took many pictures during the process of freehand painting and I will write a step by step article for this method. This article will be published in the next issue of Figure Painter Magazine, will be announced again when it's released :)
However, I also took the pictures during painting the base and this will be written as step by step article and posted on my blog soon :)

นี่เป็นผลงานชิ้นที่สามสำหรับโครงการ SMOD ครับ มันดัดแปลงมาจากตัว 2005 Games Day Miniature - Veteran Sergeant Aurelius โดยการเปลี่ยนจากหัวเดิมที่เป็นหน้าคน มาเป็นหัวใส่หมวกจากชุด Space Marines Vanguard Veteran Squad และทำส่วนของธงที่อยู่บนแบ็คแพ็คขึ้นมาใหม่ด้วย Magic sculpt กับแท่งพลาสติกครับ  ส่วนการทำสีจะใช้วิธีการแบบเดิมๆที่ทำอยู่เป็นประจำครับ ทั้งการเกลี่ยสีไล่แสงเงา ทำสีในส่วนโลหะด้วยเทคนิค NMM และการวาดลวดลายลงบนธง ซึ่งเป็นส่วนที่ท้าทายที่สุดของงานชิ้นนี้และช่วยทำให้ตัวมินินั้นดูโดดเด่นขึ้นมากครับ ผมถ่ายภาพขั้นตอนระหว่างการทำสีในส่วนลวดลายบนธงไว้ และจะนำมาเขียนเป็นบทความที่สอนวิธีการทำแบบทีละขั้น (step by step) ซึ่งบทความนี้จะถูกตีพิมพ์ลงในนิตยสาร Figure Painter Magazine ฉบับถัดไปครับ นิตยสารนี้จัดทำออกมาแบบอีบุ๊คและขายเป็นไฟล์ PDF ให้ผู้ซื้อนั้นโหลดไปอ่าน ออกมาแล้วทั้งหมด 13 ฉบับ ถ้าสนใจลองเข้าไปดูได้ตามลิ๊งค์ตรงชื่อหนังสือครับ 
อย่างไรก็ตาม ผมได้ถ่ายรูปในส่วนขั้นตอนของการทำสีฐานของงานชิ้นนี้ไว้เช่นกันครับ ขอเวลาเขียนบทความซักนิดแล้วจะนำมาลงในบล็อกเร็วๆนี้ครับ :)

By the way, this mini is now on sale. If you interested, please take a look at the auction on eBay HERE :)




Friday, June 20, 2014

SMOD 03 (wip3)

A small update of this project. The banner has finished painting, it took a lot of time than I expected. Below you will see the paints on my palette that I used only for painting this banner , quite a lot of shades for small area :) 
more to come soon..

อัพเดตงานเพิ่มเติมครับ ทำสีในส่วนของธงเรียบร้อยแล้ว ผมลงรูปของสีที่ใช้สำหรับเพนท์ธงนี้ให้ดูที่ด้านล่างด้วยครับ จะเห็นว่าใช้สีค่อนข้างเยอะสำหรับพื้นที่่เล็กๆ เพราะต้องผสมให้เฉดสีนั้นไล่น้ำหนักกันเพื่อที่จะไล่แสงเงาได้สะดวกครับ :)


Thursday, June 5, 2014

SMOD 03 (wip2)

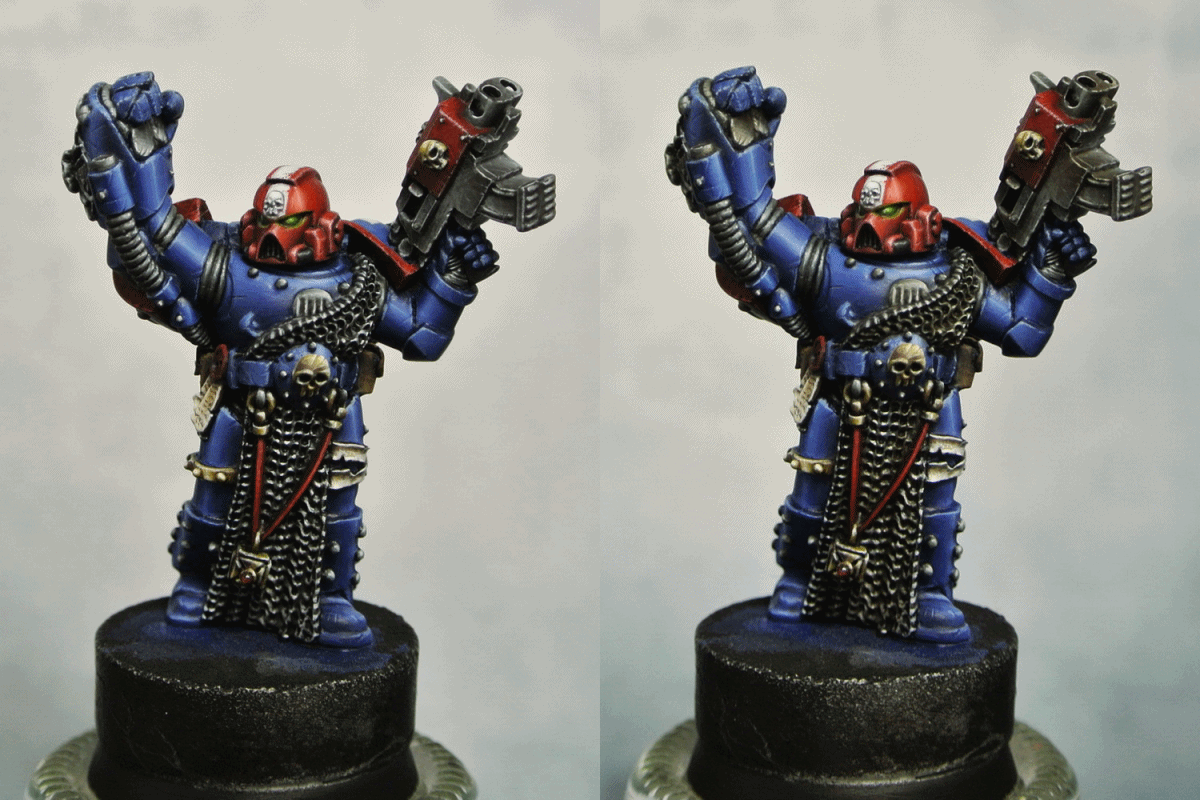
I've finished painting Ultramarines Veteran Sergeant (except backpack & banner) The NMM technique was done with the same method HERE as usual, but this time I used oil paint to wash the NMM areas in order to make it has more brownish and make it looks like a worn steel. You can see the different between before and after wash in the comparision pics below, especially on the gun part and chainmail.
Next, painting the banner and the base, more update soon :)

ผมทำสีในส่วนของตัว Ultramarines Veteran Sergeant เสร็จเรียบร้อยแล้วครับ ในส่วนของการทำสีโลหะนั้นก็ใช้เทคนิคการเพนท์แบบ NMM เช่นเดิมครับ ลองเข้าไปดูวิธีการเพนท์แบบนี้ได้ตามลิ๊งค์ครับ [click HERE] แต่ครั้งนี้จะต่างไปหน่อยคือใช้สีน้ำมันมาย้อมในส่วนของ NMM โลหะทั้งหมดอีกที เพื่อที่จะให้สีมันดูอมน้ำตาล เหมือนกับสีของโลหะที่ผ่านการใช้งานครับ ลองสังเกตุดูความแตกต่างก่อนและหลังการวอชในรูปที่ลงเปรียบเทียบไว้ด้านล่างนะครับ โดยเฉพาะตรงส่วนของปืนและชุดคลุมที่จะเห็นได้ชัดครับ
ต่อไปจะเริ่มทำส่วนของแบ็คแพคและธง รวมไปถึงสีของฐาน แล้วจะนำความคืบหน้ามาลงอีกทีครับ :)


I used Winsor & Newton "Raw Umber" diluted with White Spirit (or you can dilute it with Turpentine).

ผมใช้สีน้ำมันของ Winsor & Newton "Raw Umber" ผสมกับ White Spirit หรือจะผสมด้วย Turpentine ก็ได้ครับ


Comparison before & after

เปรียบเทียบก่อนและหลัง


more views


Tuesday, May 27, 2014

In progress, SMOD 03

Here are some pics of my current project, Ultramarines Veteran Sergeant for SMOD no.03. I used Citadel Macragge Blue as base color for the armor, mixed with black and Vallejo Intense Blue for shadows and off white for highlight. Also, I posted the pics of this mini on the plinth before painted below. More progress will be posted soon :)

ผลงานล่าสุดที่กำลังทำอยู่ตอนนี้ครับ Ultramarines Veteran Sergeant สำหรับโครงการ SMOD no.03 สำหรับมารีนตัวนี้ ผมใช้สี Citadel Macragge Blue เป็นสีพื้นในส่วนของเกราะครับ และนำสีนี้ไปผสมกับสีดำและสี Vallejo Intense Blue เพื่อให้สีเข้มขึ้นและใช้ในการไล่สีส่วนของเงา และผสมสีพื้นกับสีขาวเพื่อให้สีอ่อนลงและใช้ในการไล่สีส่วนของไฮไลท์ครับ ส่วนภาพของตัวมารีนก่อนที่จะทำสีและฐานวางผมลงรูปเอาไว้ด้านล่างครับ ขั้นตอนเพิ่มเติมจะนำมาลงเร็วๆนี้ครับ :)


By the way, be careful when drop the paint on palette, I lost half of the bottle because I did not notice the dropper device is stuck in the bottle cap. T_T

มีข้อควรระวังมาฝากกันนิดนึงสำหรับท่านที่ใช้สี Vallejo นะครับ เวลาเปิดฝาเพื่อที่จะหยดสีลงบนจานสี ลองสังเกตุดูนิดนึงว่าจุกของขวดยังติดดีอยู่รึเปล่า มิเช่นนั้นอาจจะเป็นแบบผมได้ เสียสีไปเกือบครึ่งขวดเพราะไม่ทันสังเกตุว่าจุกขวดมันหลุดไปติดอยู่ด้านในของฝา T_T


Wednesday, May 14, 2014

Step by Step - Making ruined marble temple on plinth Part 2

- Painting 


I started by searching through the internet to find any reference pictures of brown marble that I planned to do, in order to learn about the pattern and color of marble. This is one of the important things to do before start painting anything, in my opinion. However, mostly of the brown marble pics that I found was difficult to paint because it has many details in it or does not match with my needs (in color & pattern). Until I have found a suitable light brown marble pic from art-faux.com. I was really surprised when I know it's a painted marble, not a real thing. It's call "Faux painting" (definition from Wikipedia) that used for decorative in 1:1 scale. They described about this technique and how they painted in their website and their finished pieces was really amazing (you can find it HERE)

การทำฉากวิหารหินอ่อนที่โดนทำลายบนฐานขนาดเล็ก ตอนที่ 2

ในส่วนของการทำสี ผมเริ่มจากการเซิจหาภาพอ้างอิงของหินอ่อนสีน้ำตาลแบบที่ผมต้องการจะมำครับ เพื่อที่จะได้ศึกษาถึงเรื่องของรูปแบบลวดลาย และสีของหินอ่อน นี่เป็นขั้นตอนที่สำคัญในการทำงานสำหรับผม ก่อนที่จะเริ่มลงมือทำสีครับ ซึ่งรูปส่วนใหญ่ที่หาได้นั้น จะมีรายละเอียดบนหินอ่อนที่ดูซับซ้อนและค่อนข้างยากในการใช้เป็นแบบสำหรับทำสีครับ ผมต้องการแบบของหินอ่อนที่ดูไม่ซับซ้อน จนได้ไปเจอภาพจากทางเวปไซต์ art-faux.com ที่ดูลงตัวกับสิ่งที่อยากจะทำ แถมยังต้องประหลาดใจเมื่อรู้ว่าภาพที่เห็นเป็นการทำสีขึ้นมาเพื่อเลียนแบบของจริงด้วย เลยยิ่งเหมาะสมเข้าไปใหญ่ การทำสีแบบนี้เรียกว่า Faux painting เป็นเทคนิคในการทำสีเพื่อเลียนแบบลักษณะของวัสดุจริง อย่างเช่น หินอ่อน ไม้ หรือ หิน และใช้สำหรับการตกแต่งอาคารครับ (ลองเข้าไปดูความหมายเพิ่มเติมได้ใน Wikipedia ครับ) นอกจากนี้ในเวปไซต์นี้เค้าได้อธิบายเกี่ยวกับวิธีในการทำงานแบบคร่าวๆไว้ด้วย และภาพของผลงานที่ทำเสร็จแล้วก็ดูเหมือนกับหินอ่อนจริงๆและน่าทึ่งมากครับ ลองเข้าไปดูได้ที่นี่ครับ HERE 

courtesy of http://art-faux.com/
I opted this picture as a reference for my project because it doesn't have too much details and will be easy to paint rather than using a very detailed reference picture. Then I start mixing the color and trying to mix it as close to the reference, and here are the list of the colors for this method. (from Vallejo Model Color)

ส่วนนี่เป็นภาพต้นแบบที่ผมนำมาใช้ครับ เนื่องจากมีรายละเอียดไม่เยอะเกินไป ทำให้ง่ายต่อการทำสีมากกว่าแบบที่มีรายละเอียดเยอะๆครับ จากนั้นผมเริ่มผสมสีไว้สำหรับการทำสีหินอ่อน และพยายามผสมให้สีนั้นดูใกล้เคียงกับภาพต้นแบบ และนี่คือรายชื่อของสีที่ใช้ครับ ทั้งหมดเป็นสีของ Vallejo Model Color

1. Base color - 70918 Ivory + little amount of A & B
2. Light Marble - Base color + Ivory
3. Veining color - Base color + B
A. 70822 German Cam. Black Brown
B. 70871 Leather Brown
C. Black


After primed the base with black. I start painting with base color (1) onto the pillar and the floor plate. Note, I painted on the side edges in order to simulate it as thin marble plates on top of the soil.

หลังจากพ่นรองพื้นบนฐานด้วยสีดำ ผมเริ่มลงสีพื้นของหินอ่อนก่อนในบริเวณเสาและแผ่นหินบนพื้น ด้วยสี Base color (1) ครับ ลองสังเกตุดู ผมทาให้สีนั้นเกินลงไปในขอบด้านข้างของพื้นด้วยครับ เพื่อจำลองลักษณะความหนาของแผ่นหินอ่อนที่ติดอยู่บนพื้นดิน


Then I paint on the soil and debris under the floor with various grey shade, yellow ochre and brown (sorry for did not take a picture during this step)

จากนั้นทำสีในส่วนของพื้นดินและเศษซากปรักๆต่างๆที่องทับถมอยู่ใต้แผ่นหิน ด้วยโทนสีเทา, สีน้ำตาล และสีเหลือง yellow ochre (ขั้นตอนนี้ไม่ได้ถ่ายภาพระหว่างการทำเอาไว้ ต้องขออภัยด้วยครับ)


Next step I draw the veining on the pillar and the floor with Veining color (3). This step I'm not focus on the precise lines, just drawing a quick sketch to see the overall apperance of the veining. As you can see, most of the veining lines are connected and make it looks like different shape of grids on the surface.

ขั้นต่อมา ผมเริ่มวาดส่วนของลายบนหินอ่อน ที่เหมือนกับเส้นเลือดฝอยนั่นล่ะครับ โดยใช้สี Veining color (3) ในขั้นตอนนี้จะไม่ได้เน้นที่ความคมชัดของเส้นครับ เป็นเพียงการร่างแบบคร่าวๆ เพื่อที่จะดูลักษณะภาพรวมของลายครับ ซึ่งเมื่อร่างเสร็จแล้วจะเห็นว่าแต่ละเส้นนั้นจะเชื่อมต่อกันเกือบทั้งหมด และทำให้ดูเหมือนบนพื้นผิวนั้นมีตารางที่มีรูปทรงแตกต่างกัน แบ่งออกเป็นช่องๆเชื่อมต่อกันอยู่


I add more color on the marble with Veining color(3) mix with Leather Brown and dilute with water, then shading and blending inside corner of some grids, and make it has smooth transition between the base color and brown.

ผมเพิ่มสีของหินอ่อนเพิ่มเติม ด้วยสี Veining color(3) แต่ครั้งนี้ผสมกับ Leather Brown เพื่อให้สีนั้นเข้มขึ้นและเจือจางด้วยน้ำ เพื่อทำให้ทาเกลี่ยไล่สีได้ง่ายขึ้น จากนั้นทาลงในส่วนมุมด้านในของบางช่องที่แบ่งไว้บนหินอ่อน และพยายามเกลี่ยให้สีนั้นกลมกลืนไปกับสีพื้นครับ


Then add another color with Light Marble (2) and randomly shading and blending inside corner on some grids, in order to make the marble has various shades on the surface.

จากนั้นเพิ่มสีที่อ่อนกว่าสีพื้นลงไปในหินอ่อน ด้วยสี Light Marble (2) แล้วทาลงในส่วนมุมด้านในของบางช่องที่แบ่งไว้บนหินอ่อน และทาเกลี่ยและไล่สีให้กลมกลืนกับสีพื้นเช่นเดียวกัน เพื่อที่จะทำให้หินอ่อนนั้นดูมีสีที่หลากหลายทั้งกลางอ่อนเข้มครับ


For painting the veining, it is important to use a fine point brush for this method in order to make the line as small as possible. I use Veining color (3) and draw it on the same position from the previous step (veining sketch) but this time, drawing the line with precision and make it has more veining details than the sketch, and also try to draw it as the tremulous lines as seen in the reference.

สำหรับขั้นตอนนี้จะเป็นการทาเก็บรายละเอียดของลายบนหินอ่อนครับ ซึ่งถ้าหาพู่กันที่คุณภาพดีๆ ปลายเรียวและเล็ก ก็จะช่วยทำให้การวาดเส้นที่มีขนาดเล็กๆนั้นทำได้ง่ายขึ้น และจะช่วยทำให้หินอ่อนนั้นดูสมจริงมากขึ้นครับ ผมใช้สี Veining color (3) มาวาดซ้ำลงบนลายที่ได้ร่างเอาไว้ก่อนหน้านี้ แต่ในครั้งนี้จะทำให้เส้นนั้นคมชัดและเพิ่มรายละเอียดของเส้นให้มากกว่าเส้นร่างเดิม รวมถึงทำให้เส้นนั้นดูสั่นๆเหมือนกับที่เห็นจากภาพอ้างอิงครับ


After finished painting marble, I make the dust on the ruined around the pillar base and other areas by mixing it from Yellow Ochre + Ivory + Dark Brown and little amount of Grey. Then paint on the base and blending it with water.

หลังจากที่เสร็จสิ้นในส่วนของการทำสีหินอ่อน ผมทำสีคราบดินฝุ่นต่างๆที่อยู่รอบซากปรักหักพังตรงโคนเสาและตามพื้น โดยการผสมสี Yellow Ochre + Ivory + Dark Brown และเทาอีกนิดหน่อย แล้วนำไปทาลงบนฐานและใช้น้ำช่วยในการเกลี่ยสีครับ 


I also make a mud-splattered on the ruined and pillar, by using an old paint brush dip on diluted paint and flicking on the toothpick to create this paint effect. (it's good to try it on the paper first :)

นอกจากนี้ผมยังทำคราบฝุ่นดินที่กระเด็นติดอยู่ตามซากปรักหักพังและโคนเสา โดยการใช้พู่กันเก่าๆจุ่มสีแล้วนำไปปัดบนไม้จิ้มฟัน สีจะกระเด็นเป็นเม็ดเล็กไปติดอยู่บนพื้นครับ ทางที่ดีควรจะลองเทคนิคนี้บนกระดาษดูก่อน จะได้เห็นลักษณะและทิศทางของสีว่าเป็นอย่างไร ก่อนที่จะลองทำบนชิ้นงานจริงครับ


Last step, I paint on the edges of the pillar's broken pieces, on the pillar fracture and on the edges of the floor plate, with Ivory mixed with Off White and using fine point brush. In order to simulate the apperance of marble when it broken or damage and it will have light-colored or white on the fracture.

ขั้นตอนสุดท้าย ผมแต้มสีบริเวณขอบของรอยแตกหักต่างๆ ทั้งเศษของเสาหินอ่อนบนพื้น รอยแตกหักด้านบนเสา รวมไปถึงของของแผ่นพื้นหินอ่อน ด้วยสี Ivory ผสมกับ Off White เพื่อจำลองลักษณะของหินอ่อนเวลาที่แตกหรือหัก ซึ่งจะมีสีที่ตรงส่วนที่เสียหายอ่อนกว่าสีพื้น


Here are the finished pics, and you can see the finished plinth with Emperor's Champion HERE.

และนี่คือภาพของฐานที่ทำเสร็จแล้วครับ และสามารถดููภาพของงานที่เสร็จแล้วพร้อมกับ Emperor's Champion ได้ที่นี่ครับ [Click Here]


I'm happy with the result of my first time painting marble, but I still need to practice and improve it for the better result. If you have any questions about the tutorials, feel free to ask me here or on my Face book page  Thor-Studio
Happy Painting to all of you :)

ผมรู้สึกพอใจกับการลองทำสีหินอ่อนเป็นครั้งแรกครับ แต่ก็คิดว่าคงจะต้องฝึกฝนและลองทำดูอีกเพื่อให้ได้ผลลัพท์ที่ดีขึ้น เพราะก็ยังมีข้อผิดพลาดอยู่บ้าง เอาไว้ครั้งหน้าจะแก้ตัวใหม่ หวังว่าคงจะเป็นประโยชน์นะครับ ถ้ามีอะไรสงสัยก็ถามมาได้ครับ หรือเข้าไปคุยกันที่เฟซบุ๊คก็ได้ครับ Thor-Studio แล้วพบกันใหม่ครับ