Wednesday, March 12, 2014

Capt’n Sapo (wip5)

More update on my Sapo :) The area above the lips and nose has done shading, I created more textures in this area by added small horizontal and vertical lines especially on the upper lip. I also painted the skin around the eyes to match with the lips by used the same colors, and it also makes the eyes stand out from the skin tone.

ความคืบหน้าของงานชิ้นนี้ครับ ผมทำสีไล่แสงเงาในบริเวณเหนือริมฝีปากและจมูกเรียบร้อยแล้ว โดยใช้สีและวิธีการแบบเดียวกับที่ลงไว้ก่อนหน้านี้ครับ  และได้เพิ่มเส้นแนวนอนและแนวตั้งเล็กๆในบริเวณนี้ เพื่อให้ริมฝีปากดูมีรายละเอียดพื้นผิวมากขึ้นด้วย นอกจากนี้ยังทำสีผิวบริเวณรอบดวงตาด้วยสีโทนเดียวกับริมฝีปากเพื่อให้สีทั้งสองส่วนนั้นดูรับกัน และยังช่วยทำให้สีของดวงตานั้นดูเด่นและตัดกับสีผิวด้วยครับ


Monday, March 10, 2014

Capt’n Sapo (wip4)

For shading the colors, I started by mixing the colors for two skin tones. Gradient from light to dark in order to paint both areas at the same time. I painted on the light skin area first (chin) with the first highlight by mixing the base color with sand yellow and tried to paint it on the edge of every wrinkles. Then added the shadow on the lower edge of wrinkles for make a contrast, by mixing the base color with dark green and little bit of black. Then added more two or three layers of shadow and highlight until satisfied with the contrast. This method will help to emphasize the details and textures on the bust.
Then continued shading the rest of the dark skin area with this method as well but remember to paint the gradient from light on the upper area to dark on the lower area. The lips was done with the same method but changed the colors to red and mixed with ivory and little bit of brown violet for reduced the freshness of this color.

สำหรับการทำสี ผมเริ่มจากผสมสีเอาไว้สำหรับสีผิวทั้งสองโทน ไล่จากอ่อนไปเข้ม แล้วทำสีทั้งสองไปพร้อมๆกัน โดยเริ่มจากส่วนของผิวสีอ่อนก่อนโดยการผสมสีพื้นกับ Sand yellow เพื่อให้สีสว่างขึ้น แล้วนำไปทาเกลี่ยบริเวณขอบด้านบนของทุกๆริ้วรอยย่น จากนั้นทำในส่วนของเงาโดยผสมสีพื้นกับสี dark green และดำนิดหน่อย แล้วทาเกลี่ยบริเวณขอบล่างของแต่ละริ้วรอย จากนั้นผสมสีให้อ่อนหรือเข้มขึ้นแล้วทาซ้ำในส่วนของแสงและเงาจนพอใจ แล้วจึงทาไล่สีในบริเวณผิวสีเข้มส่วนที่เหลือด้วยวิธีเดียวกัน แต่อย่าลืมไล่สีจากส่วนที่อ่อนกว่าให้สีค่อยๆเข้มลงไปยังส่วนที่ต่ำกว่า วิธีการทาแบบไล่แสงเงาในแต่ละจุดนี้ จะช่วยเน้นรายละเอียดและพื้นผิวที่อยู่บนชิ้นงานให้ดูมีมิติมากขึ้น
ในส่วนของริมฝีปากก็ใช้วิธีการเดียวกัน แต่เปลี่ยนสีพื้นมาเป็นสีแดง ผสมกับ ivory และเขียวนิดหน่อย เพื่อลดทอนความสดของสี

After I finished shading, I glazed the shadow area with royal purple. Especially on the lower area of the chin and under lip in order to blend the colors and make more depth. (but it's hard to see in the pics)

หลังจากที่ทาไล่สีเสร็จ ผมทาเคลือบบางๆในส่วนของเงาอีกครั้งด้วยสี royal purple โดยเฉพาะในบริเวณด้านใต้คางและใต้ริมฝีปาก เพื่อเน้นในส่วนของเงาและช่วยให้สีนั้นกลมกลืนและดูลึกมากขึ้น (แต่ถ่ายรูปมาแล้วมองไม่เห็นเท่าไหร่)


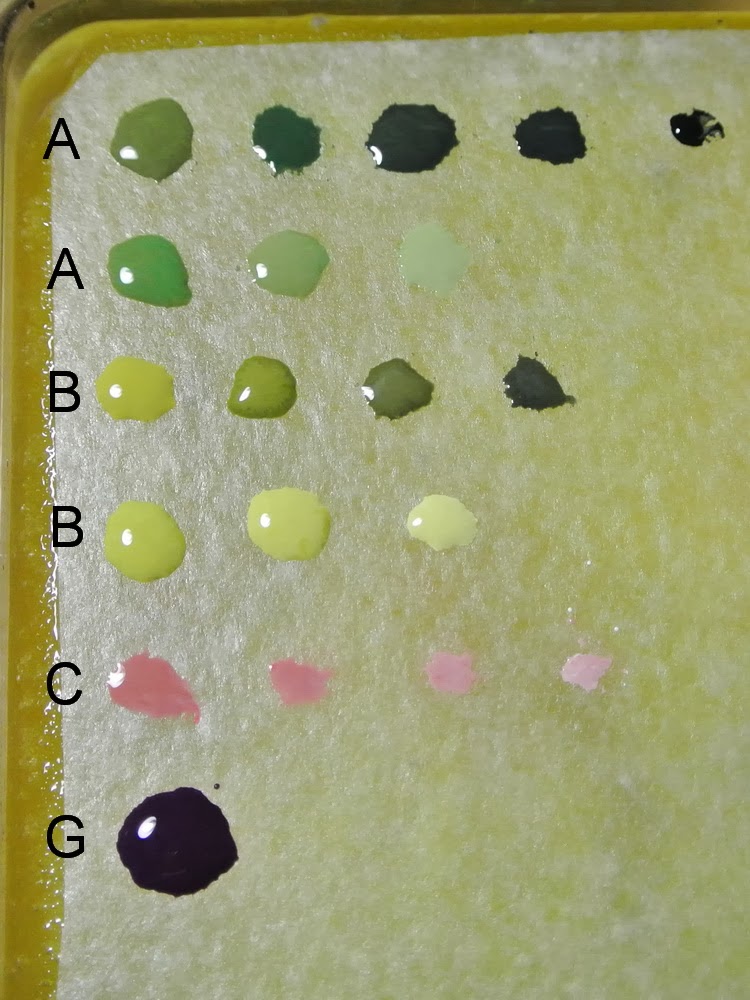
And here is the picture of my wet palette and list of the colors
ภาพด้านล่างเป็นสีที่ผสมไว้กับเบอร์สีที่ใช้ครับ

(A) Dark skin area
      Base : Brown Violet 70887
      Highlight : base + Sand yellow 70916
      Shadow : base + German ext.dark green 70896 + Black
(B) Light skin area
      Base : Middle stone 70882
      Highlight : base + Sand yellow 70916
      Shadow : base + Black
(C) Lips area
      Base : Vermillion 70909 + Ivory 70918 + Brown Violet 70887
      Highlight : base + Ivory 70918
      Shadow : base + Royal Purple 70810
(G) for glazing 
      Royal Purple 70810 + glaze medium 


It was difficult for me to explain the painting methods in English. Please remind me if I used incorrect words or not explain it clearly, I'll try to make it better  :)

Saturday, March 8, 2014

Capt’n Sapo (wip3)

I started painting Sapo on the skin area. After primed the whole surface with Citadel Chaos black, I painted the base color for the skin tone with Vallejo Model Color (VMC) Brown violet and Middlestone for the light skin area (chin and above the lip). Then I blended between two colors with wet blending technique in order to make the smooth transition from light color to the dark.

ผมเริ่มทำสีในส่วนของผิวก่อน โดยพ่นสีรองพื้นทั้งชิ้นงานก่อนเป็นอันดับแรก ด้วยสีสเปรย์ของ Citadel สีดำ Chaos black จากนั้นเริ่มทาในส่วนของสีผิวด้วยสี Vallejo Model Color (VMC) Brown violet ผิวสีเข้ม และ Middlestone สำหรับผิวสีอ่อนในบริเวณคางและเหนือริมฝีปาก และใช้เทคนิคการเกลี่ยสีแบบ wet blending technique เพื่อให้รอยต่อระหว่างสีทั้งสองสีนั้นกลมกลืนกัน


Now the base color is ready and it's time to start shading, more to come soon :)

Friday, March 7, 2014

Capt’n Sapo (wip2)

One thing that is important (in my opinion) when you want to paint a bust, you need to have a plinth to display it. Because most of the bust was designed to have only half (or less) of the body and it can't stand on their own. The plinth will solve this problem and display your bust beautifully than leave it on the small base, even makes your bust look more valuable as a piece of art. :)
I ordered this plinth from Andrea Miniatures website, it was the cheapest plinth that I found from online store and I think it suits with my Sapo very well. 

สิ่งหนึ่งที่ผมคิดว่าสำคัญในการที่จะทำงานประเภท bust หรือรูปปั้นครึ่งตัว ก็คือ คุณควรที่จะมีฐานแบบสูงเอาไว้สำหรับตั้งแสดงมันด้วยครับ เพราะว่างานบัสส่วนใหญ่จะออกแบบหรือปั้นมาเพียงแค่ครึ่งตัว และมักจะไม่สามารถตั้งอยู่ได้ด้วยตัวเอง ดังนั้นฐานแบบสูงจึงเป็นส่วนที่จะช่วยให้มันตั้งแสดงได้อย่างสวยงามมากกว่าที่จะวางอยู่บนฐานเตี้ยๆ และยังช่วยทำให้ผลงานของคุณดูมีคุณค่ามากขึ้นเหมือนกับงานศิลปะชิ้นหนึ่งอีกด้วย
สำหรับฐานไม้นี้ ผมสั่งมาจากเวปของ Andrea Miniatures ครับ ในบ้านเราอาจจะหาฐานไม้แบบนี้ลำบากหน่อย อาจจะต้องลองสอบถามจากร้านที่คุณซื้อโมเดลเป็นประจำดูหรือไม่ก็ลองสั่งจากอินเตอร์เน็ตครับ 


However, the natural wood color is not the thing that I look for, so I coated it with Varathane Wood Stain (Red Oak) that I bought from Home Depot. After coated 3 times with paint brush and left it to dry completely, it becomes to a beautiful red brown plinth with a gloss finish :)

เนื่องจากว่าผมไม่อยากได้ฐานแบบสีไม้ธรรมชาติ ผมเลยย้อมสีไม้เองด้วย Varathane Wood Stain สีโอ๊คแดงครับ ส่วนในบ้านเราลองดูตามร้านก่อสร้างทั่วไป ลองถามถึงแชล็คทาไม้จะมีให้เลือกอยู่หลายสีครับ วิธีใช้ก็เอาแปรงจุ่มสีแล้วทาไปทางเดียวกันจนทั่วทั้งชิ้น รอบแรกสีจะยังไม่เข้มครับ เมื่อทิ้งไว้ซักพักจนเริ่มแห้งแล้วค่อยทาทับอีกรอบ สีจะเริ่มเข้มขึ้นและทาทับไปเรื่อยๆอย่างนี้จนกว่าจะพอใจครับ


Stay tuned!

Thursday, March 6, 2014

Capt’n Sapo (wip1)

My latest project to join with a community painting project "Challenge Sapo" at WAMP forum, held by WAMP and Figone. Every participants in this contest will paint the same miniature "Captain Sapo" from Figone, sculpted by Allan Carrasco and he will be judging the winning entry by himself. 
I've never painted bust before but I want to paint them for a long time. Actually I want to paint a military or historical bust (from Young Miniatures) but to begin with this bust maybe a great experiment or practice before I will try with those busts.
At this moment, it has 15 people who joined in this contest and you can see some of their work in progress HERE.

ผลงานล่าสุดที่ทำเพื่อร่วมประกวดกับทางเวปไซต์ WAMP ที่จัดร่วมกับทาง Figone ในหัวข้อ "Challenge Sapo" ครับ โดยคนที่เข้าร่วมจะทำผลงานจากต้นแบบเดียวกันคือ "Captain Sapo" ที่เป็น bust หรือรูปปั้นครึ่งตัวที่ผลิตโดย Figone และปั้นโดย  Allan Carrasco ซึ่งจะเป็นผู้ที่ร่วมตัดสินในการประกวดนี้ด้วยครับ
ตัวผมเองยังไม่เคยเพนท์ผลงานประเภทบัสท์มาก่อน แต่ว่าอยากจะลองทำมานานแล้วเพราะชอบงานปั้นบัสท์ของยี้ห้อ Young Miniatures มากๆ พอดีมีโอกาสได้มาลองเพนท์กับงานชิ้นนี้ จะได้เป็นการทดลองและเรียนรู้ไปในตัวก่อนจะหาบัสท์แบบอื่นๆมาทำในอนาคตครับ ตอนนี้มีผู้เข้าร่วมแล้วประมาณ 15 คน ลองเข้าไปดูความคืบหน้าของผลงานบางส่วนได้ตามลิ๊งค์ครับ HERE


This bust has very well cast in a good quality resin. It cast in one piece with very well details, I found only two seams line around the straps that need to fill with putty. Now it's ready to paint and I'll post more update soon.

งานชิ้นนี้หล่อออกมาเป็นชิ้นเดียวกันด้วยเรซิ่นคุณภาพดี รายละเอียดต่างๆนั้นดูดีมากและมีตะเข็บเล็กๆที่ต้องอุดด้วยพุตตี้เพียงแค่สองจุดเท่านั้น ผมจะโพสต์ความคืบหน้าเพิ่มเติมในเร็วๆนี้ครับ

สุดท้ายนี้ ต้องขออภัยด้วยนะครับที่ก่อนหน้านี้เกือบ 1 ปี ที่ผมเขียนบล็อกโดยที่ไม่ได้พิมพ์ภาษาไทยกำกับไว้ด้วยเลย เนื่องจากไม่มีภาษาไทยบนแป้นพิมพ์เลยค่อนข้างจะลำบากเวลาที่ต้องพิมพ์ยาวๆ ตอนนี้ได้แผ่นยางภาษาไทยมาแล้ว ต่อไปจะพยายามพิมพ์ภาษาไทยกำกับไว้ด้วยในทุกๆครั้ง (โดยเฉพาะที่เกี่ยวกับวิธีการทำงาน) ถ้ามีคำถามหรือสงสัยอะไรก็สอบถามเข้ามาได้ครับ ทั้งทางบล็อกหรือทางอีเมล์ที่ลงไว้ก็ได้ครับ :)