I wish you a blessed holiday season. May this Christmas bring you comfort, joy, peace and happiness to last throughout the coming year!

Thursday, December 25, 2014
Monday, December 22, 2014
Soviet Mountaineer Officer 1942 (part 5)
After coated the body with Mr.Hobby Super Clear (Flat) and glued the head on the body. Now it has only one part left and waiting to be painted; a Soviet PPSh-41 submachine gun. I will post more updates soon!
หลังจากที่พ่นเคลือบด้านด้วย Mr.Hobby Super Clear (Flat) และติดส่วนของหัวเข้ากับลำตัวแล้ว ตอนนี้เหลือเพียงแค่ชิ้นส่วนเดียวที่รอการทำสีอยู่ คือปืนกล PPSh-41 ครับ คาดว่าโปรเจกต์นี้น่าจะใกล้เสร็จเร็วๆนี้ แล้วจะนำความคืบหน้ามาลงอีกทีครับ

To all of you, Happy Holidays & Best Wishes :)
Thursday, December 18, 2014
Soviet Mountaineer Officer 1942 (part 4)
More update from my bust project. I have almost finished painting on the body part, just some minor details left on the backpack. The black tunic was finished shading with dark grey and grey, but it looks quite dark and not clearly seen the shading in the picture. I will use Mr.Hobby Super Clear (Flat) to coat the surface later for a matt finish after I finished painting the body, and hope the shading will be seen clearly next time.
ความคืบหน้าเพิ่มเติมครับ ตอนนี้ผมทำสีในส่วนของลำตัวเกือบเสร็จหมดแล้ว เหลือแค่เพียงรายละเอียดเล็กๆน้อยบนเป้สะพายหลัง ในส่วนของเสื้อสีดำนั้นใช้การเกลี่ยสีไล่แสงเงาด้วยสีเทาและเทาเข้ม แต่ว่าอาจจะมองเห็นการไล่สีได้ไม่ค่อยชัดในภาพที่ถ่ายมาครับ หลังจากทำสีเสร็จทั้งหมดแล้วคงจะพ่นเคลือบด้วยเคลียร์ด้านของ Mr.Hobby Super Clear (Flat) อีกที เพื่อให้พื้นผิวนั้นดูด้านมากกว่านี้และลดการสะท้อนแสงลง ซึ่งน่าจะช่วยให้เห็นสีของชิ้นงานได้ดีขึ้นเวลาถ่ายรูปครับ


ความคืบหน้าเพิ่มเติมครับ ตอนนี้ผมทำสีในส่วนของลำตัวเกือบเสร็จหมดแล้ว เหลือแค่เพียงรายละเอียดเล็กๆน้อยบนเป้สะพายหลัง ในส่วนของเสื้อสีดำนั้นใช้การเกลี่ยสีไล่แสงเงาด้วยสีเทาและเทาเข้ม แต่ว่าอาจจะมองเห็นการไล่สีได้ไม่ค่อยชัดในภาพที่ถ่ายมาครับ หลังจากทำสีเสร็จทั้งหมดแล้วคงจะพ่นเคลือบด้วยเคลียร์ด้านของ Mr.Hobby Super Clear (Flat) อีกที เพื่อให้พื้นผิวนั้นดูด้านมากกว่านี้และลดการสะท้อนแสงลง ซึ่งน่าจะช่วยให้เห็นสีของชิ้นงานได้ดีขึ้นเวลาถ่ายรูปครับ
Thursday, December 4, 2014
Sunday, November 23, 2014
Soviet Mountaineer Officer 1942 (part 3)
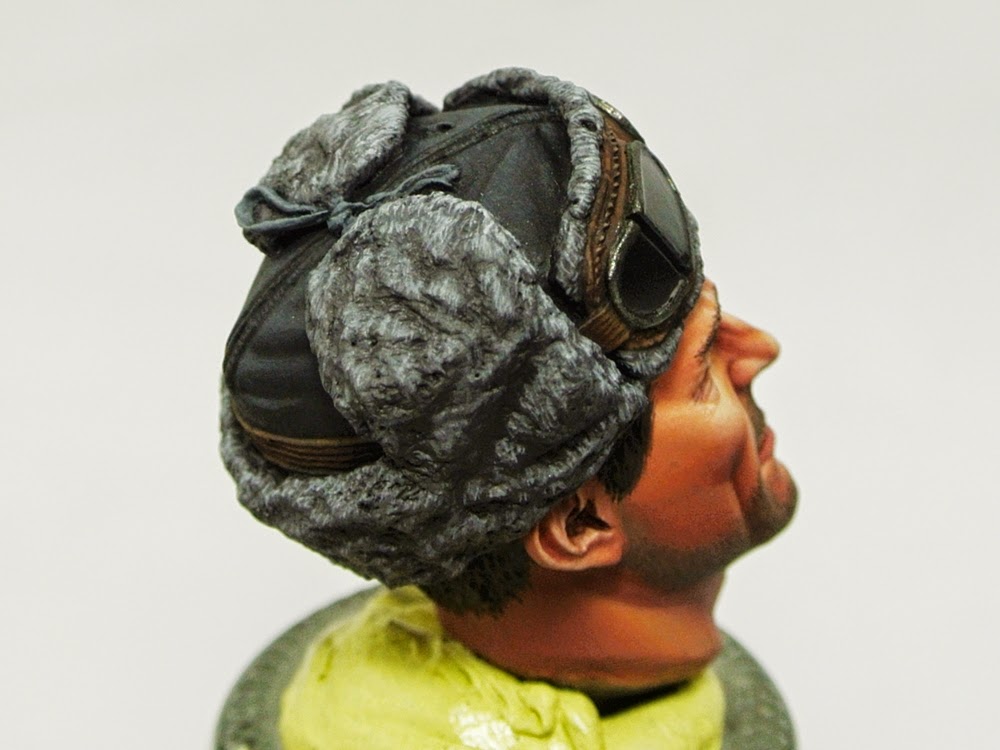
A little update from this project. The cap, goggles, sweater and rope have already finished. This project is quite big than my usual scale and has enough room to play with my paintbrush, so I think it would be great to paint and demonstrate the details of the fabric or material as I have been inspired by the works of Kirill Kanaev.
I used a paintbrush No.0 from Winsor and Newton series 7 for painting the small details such as knitting texture on the sweater, fabric and fur texture on the cap and rope texture. I also painted all of the details with Zenithal lighting theory in order to create light and shadow contrasts on the bust. For example, the color on the rope is brighter on top (left shoulder - highlight) then gradually gets darker in the bottom (right waist - shadow).
Note: a Russian fur cap called ushanka, it has ear flaps that can be tied up to the crown of the cap, or tied at the chin to protect the ears, jaw and lower chin from the cold. The thick dense fur also offers some protection against blunt impacts to the head. (ref. Wikipedia)
ความคืบหน้าเล็กน้อยของโครงการนี้ครับ ผมทำสีในส่วนของหมวก แว่นกันลม เสื้อไหมพรมและเชือกเสร็จเรียบร้อยแล้วครับ ซึ่งมาตราส่วนของงานประเภทบัสนี้จะค่อนข้างใหญ่กว่างานปรกติที่ผมทำ จึงทำให้มีพื้นที่มากพอให้ใส่รายละเอียดลงบนงานได้มากขึ้น ผมเลยลองเพนท์เลียนแบบลักษณะของพื้นผิวของผ้าหรือวัสดุในส่วนต่างๆ เพื่อทำให้ชิ้นงานนั้นดูมีรายละเอียดมากขึ้น ผมเองได้แรงบันดาลใจในการลองเพนท์แบบนี้จากการที่ได้ดูผลงานของ Kirill Kanaev ครับ
ผมใช้พู่กันเบอร์ 0 ของ Winsor and Newton series 7 ในการทาเก็บรายละเอียดเล็กๆเหล่านี้ แม้พู่กันแบบนี้จะมีราคาต่อด้ามค่อนข้างสูง แต่ถ้าเทียบกับคุณภาพแล้วก็ถือว่าคุ้มค่ามากครับ เพราะจะช่วยให้ควบคุมการเพนท์ในพื้นที่เล็กๆหรือเส้นเล็กๆได้ดีกว่าพู่กันทั่วไปมากๆครับ นอกจากนี้ในการเพนท์บัสชิ้นนี้ ผมใช้วิธีการเพนท์แบบ Zenithal lighting ซึ่งจะเป็นการกำหนดให้แสงนั้นส่องลงมาจากด้านบนของชิ้นงาน และทำให้เห็นความแตกต่างระหว่างแสงและเงา โดยที่ส่วนที่อยู่ด้านบนชิ้นงานจะมีสีที่สว่างที่สุดและสีจะค่อยๆมืดลงไปยังส่วนที่อยู่ด้านล่าง ยกตัวอย่างจากในรูปด้านล่าง เชือกที่พันอยู่รอบลำตัวจะมีสีขาวที่สว่างสุดตรงบริเวณไหล่ซ้ายและสีของเชือกจะค่อยๆเข้มขึ้นในส่วนที่ต่ำลงมาและจะเข้มสุดตรงบริเวณเอวด้านขวาซึ่งกำหนดให้จุดนั้นเป็นส่วนของเงาครับ
หมายเหตุ: หมวกขนสัตว์แบบรัสเซียนี้ เรียกว่า ushanka ครับ เป็นหมวกที่มีที่ครอบหูโดยจะผูกเก็บที่ครอบเอาไว้ด้านบนหมวกเหมือนอย่างที่ตัวโมเดลทำมา หรือจะครอบปิดหูเพื่อกันความหนาวและผูกให้ติดกันบริเวณใต้คางครับ นอกจากนี้ขนที่หนาๆบนหมวกยังช่วยในการกันกระแทกที่อาจจะเกิดต่อศรีษะของผู้สวมใส่ได้ด้วยครับ (ref. Wikipedia)
Monday, November 17, 2014
MV's Bananalicious Painting Contest 2
It's a pity I didn't have a chance to participate in this epic online contest last year. This year they have two new categories and one of it has attracted my interest. "Special Free Category: Base" I've never seen any contest have this category before, so I think it will be fun to try on this one. :)
The contest ends in April 22th 2015. There is enough time to finish a new project or more for other categories, we'll see. :)
Therefore, if you want to be a part of this epic event and have a chance to win something from their Random Prize Pool, please click on their banner below for more info. :)
Bananalicious เป็นการประกวดภาพถ่ายผลงานออนไลน์ จัดโดยเว็บไซต์ MASSIVE VOODOO ครับ ในปีนี้เป็นการจัดประกวดเป็นครั้งที่สอง ซึ่งในปีแรกมีผลงานเข้าร่วมประกวดถึง 172 ชิ้นครับ ส่วนปีนี้นั้นแบ่งรุ่นของการประกวดออกเป็น 8 ประเภท และมีประเภทหนึ่งที่น่าสนใจและผมยังไม่เคยเห็นมีใครจัดการประกวดสำหรับประเภทนี้มาก่อน คือ Special Free Category: Base ครับ ที่จะให้ส่งประกวดเฉพาะตัวฐานโดยไม่ต้องมีโมเดลประกอบ เลยตั้งใจว่าปีนี้จะลองร่วมสนุกในรุ่นนี้ดูครับ และถ้ามีเวลาพออาจจะทำส่งในรุ่นอื่นๆดูด้วย :)
งานประกวดครั้งนี้สามารถส่งผลงานได้ถึงวันที่ 22 เมษา ปี 2015 ครับ และทุกผลงานที่เข้าร่วมมีสิทธิได้ของรางวัลที่ระลึก Random Prize Pool จากการสุ่มรายชื่อของผู้ที่เข้าร่วมด้วยครับ ถ้าท่านไหนสนใจอยากเข้าร่วมลองไปดูรายละเอียดเพิ่มได้ตามลิ๊งค์รูปภาพครับ :)
Thursday, November 6, 2014
Night Lords Night Raptor (part 2)
One of the attractive point of this mini is the expression of the movement. I wanted the base that can be shown this point so it ended up with this design. It has a ruined large pillar as a main structure of the base. The height of the pillar and placing the mini on top of it are what help to demonstrate the movement of the mini.
The pillars was made from DAS modelling clay and coated with diluted putty and sanded with fine sand paper in order to create a smooth surface (it will be painted as marble). I put two pillars on the plinth first in order to adjust and find the suitable position for the mini and the pillars before I did the groundwork, then glued with white glue and sanded the excess from the edge of the plinth (Click Here for How to make a plinth from Toothpick box). The ruins was made from brick debris and plaster and glued together with white glue. The floor tiles was made from DAS modelling clay by rolled into thin sheet then coated with diluted putty and sanded smooth as well. I also made candlestick from plastic tube and copper wire and put it on the left side of the pillar in order to fill the empty space on that area and more proper in composition.
หนึ่งในสิ่งที่ทำให้มารีนตัวนี้ดูน่าสนใจ คือการแสดงท่าทางที่ดูเหมือนกำลังเคลื่อนไหวอยู่ ผมจึงต้องการให้ฐานของมันนั้นเป็นส่วนที่ช่วยแสดงให้เห็นในจุดนี้ได้เด่นชัดขึ้น โดยเลือกที่จะทำเป็นฐานของซากอาคาร ที่มีเสาอยู่ตรงกลางของฐานเป็นโครงสร้างหลัก และใช้ความสูงของเสาและการจัดวางมารีนบนยอดเสา เป็นสิ่งที่ช่วยทำให้เห็นถึงความเคลื่อนไหวได้ชัดเจนขึ้น เหมือนกับว่ากำลังลอยอยู่บนยอดเสาครับ
ส่วนของเสานั้นทำมาจากดินปั้น DAS modelling clay และอุดขัดผิวให้เรียบด้วยพุตตี้เพราะจะทำสีเป็นเสาหินอ่อนในภายหลังครับ จากนั้นนำเสาทั้งสองส่วนมาลองจัดวางบนฐานวงกลม เพื่อกำหนดจุดวางของเสาและตัวมารีนให้ดูสมดุลกับฐาน แล้วจึงติดกาวกับขัดส่วนที่เกินออกให้เรียบร้อยก่อนที่จะทำในส่วนพื้น (ฐานวงกลมนี้ ทำมาจากกล่องไม้จิ้มฟันครับ ลองดูวิธี่การทำได้ที่นี่ Click Here) โดยส่วนของพื้นฉากจะทำเป็นแบบซากปรักหักพังที่ทำจากเศษอิฐและปูนพลาสเตอร์ครับ (ดูวิธีการได้ที่นี่ Click Here) ส่วนกระเบื้องที่เห็นก็ทำมาจากดินปั้น DAS เช่นกันครับ โดยรีดเป็นแผ่นบางๆแล้วอุดขัดผิวด้วยพุตตี้ ก่อนนำมาตัดเป็นสี่เหลี่ยมเล็กๆ นอกจากนี้ผมทำเชิงเทียนจากแท่งพลาสติก และติดเพิ่มเข้าไปบริเวณด้านซ้ายของเสา เพื่อให้ที่ว่างบริเวณนั้นไม่ดูโล่งและช่วยให้องค์ประกอบทั้งหมดนั้นดูลงตัวมากขึ้นครับ
Sunday, October 26, 2014
Night Lords Night Raptor (part 1)
Night Lords is one of the space marines chapter that I really want to paint for a long time. Because they have outstanding and unique color scheme with the lightning crackling on their armor. I think it will be quite a challenge for painting and try to make the lightning look realistic on that tiny area. I'm not sure how it will turn out, we'll see it soon.
The mini was converted from Chaos Space Marine Raptors/Warp Talons kit. I stretched the height of the hip with Magic Sculpt, same as I did on Raven Guard Assault Marine. I also added more details on the helmet. At first, I added blade made form plastic but it looks like Zaku head with antenna. So I changed it with bat wings and sculpted skull mask from Magic Sculpt, inspired from Forge World Night Raptors that I found out later.
Night Lords เป็นหนึ่งในหน่วยของ Space Marines ที่ผมอยากลองทำสีมานานแล้วครับ เพราะว่าหน่วยนี้จะมีสีที่เป็นเอกลักษณ์มากๆ คือลายฟ้าผ่าที่พาดอยู่บนเกราะรอบๆตัว ซึ่งดูแล้วคิดว่าคงจะท้าทายดีในการลองทำสีลายฟ้าผ่าลงบนพื้นที่เล็กๆและพยายามทำให้มันดูสมจริง ไม่แน่ใจเหมือนกันว่าจะออกมาเป็นแบบไหนต้องรอดูกันต่อไปครับ
ส่วนตัวมารีนตัวนี้ ดัดแปลงมาจากชุด Chaos Space Marine Raptors/Warp Talons ครับ ผมทำการยืดส่วนเอวให้ดูยาวขึ้นโดยการปั้นเพิ่มด้วย Magic Sculpt แบบเดียวกับที่ผมได้ทำในงานชิ้นที่แล้ว Raven Guard Assault Marine เพื่อให้สัดส่วนของลำตัวนั้นดูสมส่วนมากขึ้นครับ นอกจากนี้ก็ทำการเพิ่มรายละเอียดบนหมวก ซึ่งตอนแรกผมตัดพลาสติกมาแปะ ให้มันดูมีเรื่องราวมากขึ้น แต่ดูๆไปแล้วมันดูเหมือนกับหัวของ Zaku แบบติดเสาอากาศมากกว่า พอดีไปเจอภาพของ Forge World Night Raptors ซึ่งเป็นหน่วยเดียวกับที่จะทำพอดีเลยนำมาใช้เป็นแบบ และปั้นส่วนของหน้ากากหัวกระโหลกขึ้นมาใหม่ด้วย Magic Sculpt กับส่วนของปีกค้างคาวที่ทำจากแผ่นพลาสติกครับ
 |
| (photos courtesy of http://warhammer40k.wikia.com/) |
Saturday, October 18, 2014
Raven Guard Assault Marine
(Space Marines On Display no.04)
Here are the pictures of my recently finished project. I have planned to write a Step by Step article of making and painting this base. All of the photos have already taken and it's time to write the article, the hardest part in my opinion. :) I hope to publish this article in the next issue of Figure Painter Magazine and will be announced again when it finished.
I still have some projects that waiting on my desk for a while, Soviet Mountaineer bust & Night Lords Night Raptor. I will post the update from each project soon.
Have a nice Sunday :)
ภาพของผลงานที่เสร็จแล้วครับ ผมวางแผนเอาไว้ว่าจะเขียนบทความเกี่ยวกับวิธีการสร้างและทำสีฐานของงานชิ้นนี้ ซึ่งได้ถ่ายรูปขั้นตอนต่างๆเอาไว้แล้ว เหลือในส่วนของการเขียนบทความครับ และคงจะลงตีพิมพ์ในนิตยสาร Figure Painter Magazine ฉบับถัดไป แล้วจะแจ้งให้ทราบอีกครั้งเมื่อทำเสร็จครับ
สำหรับตอนนี้ยังเหลืองานที่ทำค้างเอาไว้อยู่อีกสองชิ้น คือ Soviet Mountaineer bust และ Night Lords Night Raptor ซึ่งจะนำความคืบหน้าของแต่ละโครงการมาลงอีกครั้งเร็วๆนี้ครับ
Tuesday, October 14, 2014
Raven Guard Assault Marine (part 3)
The arms and jetpack was separated from the body for an ease of painting. I chose to paint the arms with white color as I saw on the kit box art. It was done with 4-5 layers of shading from Off White to Light Grey and lining with German Grey. The Raven Guard symbol and the name "Arepo" was hand painted and I added wear and tear on the arms after everything has finished (except the axe blade and handle).
I also painted the OSL (object source lighting) on the rear jetpack vent and inside of the jet pipes. I found a useful tutorials for this method by HopeRiver and Chest of Colors. You can find it on the links below.
The next update will be the finished piece, stay tuned :)
Dark Angel Chaplain with Jump Pack by HopeRiver
How to paint OSL effect on a jump pack by Chest of Colors
ส่วนของแขนและเจ็ทแพ็ค ผมแยกออกมาต่างหากเพื่อความสะดวกในการทำสี เนื่องจากมารีนตัวนี้ผมเลือกที่จะทำสีของแขนให้ต่างจากสีของลำตัวด้วยสีขาว ตามแบบที่ได้เห็นจากภาพตัวอย่างด้านหลังของกล่องชุดคิทนี้ครับ ผมใช้การทาเกลี่ยไล่สีประมาณ 4-5 เฉดสี ไล่จากสี Off White ในพื้นที่สว่างไปยัง Light Grey ในส่วนของเงา เพื่อให้สีขาวนั้นเกิดมิติของแสงและเงาและไม่ดูแบนครับ จากนั้นทาเก็บตามร่องและรอยต่อต่างๆอีกครั้งหนึ่งด้วยสีเทาครับ ส่วนของสัญลักษณ์รูปอีกาและตัวอักษร Arepo นั้นเขียนด้วยมือครับ และเมื่อทำสีในทุกๆส่วนเสร็จแล้ว จึงค่อยมาทำร่องรอยขูดขีดและความเสียหายต่างๆบนแขนครับ เพื่อสื่อให้เห็นถึงการผ่านสภาพการใช้งานมาอย่างพอสมควร
นอกจากนี้ในส่วนของ เจ็ทแพ็ค ผมได้ทำสีด้วยเทคนิค OSL (object source lighting) ในบริเวณของช่องระบายอากาศและด้านในไอพ่น ซึ่งเทคนิคนี้เป็นการทำสีแบบจำลองจุดกำเนิดแสงภายในชิ้นงานและแสงจะกระจายออกมารอบๆจากจุดกำเนิดนี้ ทำให้ดูแล้วเหมือนกับว่ากำลังมีไฟส่องสว่างอยู่จริงๆครับ ตัวอย่างของงานที่โดดเด่นมากๆในการใช้เทคนิคนี้
Lost in the Dark by David Powell
Firey Angel by victoria
Done and Dusted by Orki
หรือจะลองเข้าไปดูวิธีการทำสีของเจ็ทแพ็คแบบนี้ได้ตามลิ๊งค์ด้านล่างครับ เป็นวิธีที่ HopeRiver และ Chest of Colors ได้ทำเอาไว้ครับ
Dark Angel Chaplain with Jump Pack by HopeRiver
How to paint OSL effect on a jump pack by Chest of Colors
Thursday, October 9, 2014
Raven Guard Assault Marine (part 2)
The painting was finished with Vallejo and Citadel as usual. I did paint the shading on the black armor and glazed over with Intense Blue in order to make the dark blue-black armor. But it barely see on the picture because it was reflected with the light. I hope it will be seen clearly after coated with Mr.Color Super Clear (Flat) when the whole project has finished.
You can find the tutorials that I used for painting Black and NMM on the links below :)
Black color painting tutorial by Flameon
NMM Steel & Gold tutorial by HopeRiver
การทำสีของมารีนตัวนี้ผมใช้สีของ Vallejo กับ Citadel ครับ ผมทำการเพนท์ไล่แสงเงาในส่วนของเกราะสีดำและทาเคลือบทับในส่วนที่ไล่แสงเงาไว้ด้วยสีน้ำเงิน Intense Blue เพื่อที่จะให้สีของเกราะนั้นดูเหลือบๆเป็นสีดำและน้ำเงินเข้มครับ แต่ว่าถ่ายรูปออกมาแล้วจะมองไม่ค่อยเห็นเนื่องจากเกิดแสงสะท้อนบนเกราะสีดำในระหว่างถ่ายภาพ ซึ่งหวังว่าหลังจากที่พ่นเคลียร์ด้านทับเมื่อจบงานแล้ว น่าจะช่วยทำให้เห็นการไล่สีในส่วนต่างๆได้ง่ายขึ้นครับ
ส่วนด้านล่างนี้เป็นลิ๊งค์ไปยังบทความสอนวิธีการทาสีดำและทาสีเหล็กและทองแบบ NMM ที่ผมนำมาใช้ในการทำสีตัวนี้ครับ
Black color painting tutorial by Flameon
NMM Steel & Gold tutorial by HopeRiver
Subscribe to:
Posts (Atom)